Contents
Patron Portal is the self-service, customer interface allowing patrons to:
- Create and edit reservations.
- Renew current checkouts, view completed checkouts and canceled reservations.
- View assigned and checked out resources.
- View assigned Projects (requires Projects)
- Access Checkout Center information, Certified Types, Group Membership and Invoice details.
The Header

The patron portal header provides a button to either create or continue editing a reservation.
If you are creating a new reservation the button will say New
 .
.
If you are already creating or editing a Reservation the button will show the number of items in the reservation
 .
.
Clicking on your initials on the far right opens a menu to allow you to log out.
Use the navigation bar to easily move through the application.

- Home shows Upcoming Reservations, Current Checkouts, Assigned Resources, and History [More]
- Projects view active Projects and only visible with Projects [More]
- Access displays Certified Resource Types with the Certification Module and Group Membership [More]
- Centers provides Checkout Centers details and allows users to browse all authorized Centers [More]
- Billing displays all open and past invoices with the Billing Module [More]
- Help opens this documentation page
Managing Your Reservations
Create a New Reservation
Reservations can be started anywhere in Patron Portal. Both ways follow the same process detailed below. To create a new reservation:
- Press the new reservation button in the Header or New Reservation
 (icon in mobile) menu option.
 - Select the Checkout Center for the reservation.
You are now viewing the New Reservation screen.
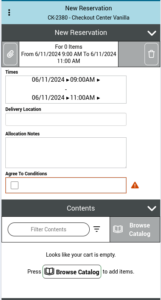
The screen in broken into two sections, the Reservation Details and the Contents.
Optional: You can click the ellipse ![]() menu on the top left to open the secondary menu:
menu on the top left to open the secondary menu:
-
- Message of the Day: Prompt the Center’s MOTD
- Center Calendar: View today and the next 6 days business hours
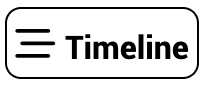
- View Timeline: View the schedules of the items added to the reservation
- Manage Repeats: Schedule repeat reservations. [More]
Reservation Details
- First adjust the Times for your reservation as needed.
- Enter all required fields indicated by alert
 icon.
icon.
- Click Show More to view optional fields.
- May include: Project, Group, Delivery Location, Class/Event Title, Custom Properties, Allocation Notes
- Save the details by clicking the checkmark icon
 or save all
  at the bottom of the section.
Attachments
Some Centers may request or require that you provide attachments for your reservation, or they may add attachments for your review. If enabled, these are managed by using the paperclip icon next to the Reservation summary.
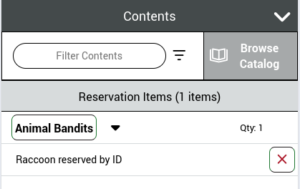
Contents
The Contents section lists the Items in the reservation or checkout. Items are added to the Reservation by using the Resource Catalog. If you don’t have any items in the Reservation yet you will be directed to the catalog.
Items will be listed by type and grouped based on the state of the item.
The list of items in the Contents may be filtered (for display only) by adding text in the Filter Contents field.
You may always reopen the Catalog by pressing the Browse Catalog button beside the filter field.
The Resource Catalog
The resource catalog breaks resources up by types and subtypes. When viewing a type you will see its subtypes (if any) as well as the resources of that type.
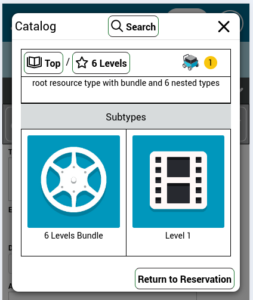
Bookmarks for specific types can be added for your convenience by clicking the Star icon next to a type name ![]() . These bookmarks will be available to you every time you enter that checkout center’s Catalog.
. These bookmarks will be available to you every time you enter that checkout center’s Catalog.
The search button helps you to search for specific items and types. For your convenience, the number of items in your reservation is always available in the Catalog header.
Attribute View
When selecting the Attribute View, resources in the catalog are organized by Category and Attribute. The top level of the catalog displays all the Categories currently in use, limited to Resources and Types visible in the Patron Portal.
Clicking on a Category will show its details along with its top-level Attributes. When you click on an Attribute, you will be directed to its details, which include a list of its child Attributes and all Resource Types assigned to it.
The breadcrumb bar above the detail views indicates the path to the current detail within the Category and Attribute tree. You can click on any element in the breadcrumb list to return to that point in the tree.
The headline above the breadcrumbs allows you to toggle between the Attribute and Type views. Additionally, on the same line, you can search for Resource Types that match one or more Attributes.
User Lists
In the Patron Portal, when viewing a Resource Type, users can add it to a User Defined list by clicking the “Add To List” button. They can choose to select one of their previously defined lists or create a new one. Please note that these lists are specific to a Checkout Center and will only be visible when browsing that particular Checkout Center’s catalog.
Viewing and Managing Lists
If one or more lists have already been created for the Center, the user will see a “Lists” button in the Main Catalog Options Bar. Clicking this button will open a modal interface that displays all available lists. From there, the user can rename or delete a list and remove any previously added types.
Adding Lists to Reservations
When a user is creating a reservation at the Checkout Center, the list view will display a button labeled “Add to Reservation.” Clicking this button will add all the items in the list to the current reservation. Please note that the same list can be added multiple times.
Adding Items
Individual items may be added to your reservation by clicking either the![]() button to add one of the type, or the
button to add one of the type, or the ![]() to add a specific item. The number of items of the type on your reservation will be visible on the type detail. In the image below, the first item of the type has already been added to the reservation.
to add a specific item. The number of items of the type on your reservation will be visible on the type detail. In the image below, the first item of the type has already been added to the reservation.
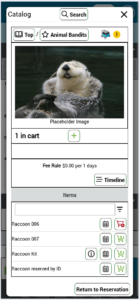
A few other important options.
 To view availability of Resources
 To view Resource information (only available by Resource ID)
 To view Resource Calendar for centers allowing individual resource reservations. Patrons can adjust the calendar view to month
  , week
  , or day
  .
.
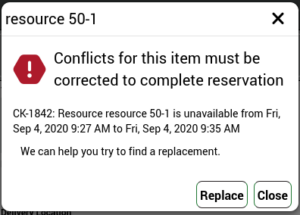
Validation
Reservations with errors cannot be submitted. If you see the following message, there are errors left to address.

Messages may appear if the reservation violates policies or one or more items are unavailable.
Unavailable items are indicated with an alert icon button.
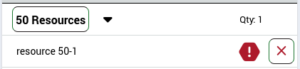
Resolve errors by removing the item, adjusting the start/end times, or clicking the icon for a set of options.
If you have not entered all the required details, but there are no other errors, you will see the following message.

Removing Items
Items may be removed from your reservation by clicking the X button next to the item.
If you are removing an already saved reservation item, removal can be undone before submitting. If you just added the item to the reservation, removal happens immediately.
Finishing Up
When the reservation is ready to be saved you will see the following at the bottom of the screen
![]()
Click Submit Reservation and confirm to save. Failing to Submit will result in lost work.
Requests
Some Checkout Centers allow Patron to Request items instead of Reserving them. Requests are not guaranteed and are a way to add items that otherwise could not be reserved due to availability or permissions.
Requests are represented with an outstretched hand icon.
- Add Request:

- Remove Request:

Scheduling Repeating Reservations
When Checkout Center policy allows for repeats and resources are added to Contents, repeats may be scheduled. Press the Manage Repeats ![]() button.
button.
- Select On and then the start Date or
- Select Every and select day of week within a start and end date range.
- Click Add then close the modal.
Edit an Existing Reservation:
When Checkout Center policy allows, Reservations may be edited providing the Start Time is sufficiently before the configured Minimum Reservation Lead Time.
Edit reservations options may include changing the Start and/or End Times, adding and removing items, and adding additional information.
To Edit a Reservation:
- Navigate to the Home
 .
. - Find the Reservation in Upcoming Reservations.
- Click the Reservation to open details.
- To edit the Reservation..
- In mobile, click the cart icon and Edit CK-##.
- On the desktop select Edit CK-## from the menu on the left.
- In mobile, click the cart
- See Create a New Reservation for details on completing and saving your edits.
Please note: If Patron Portal Reservations require approval, only those that have not yet been approved and which meet the Minimum Reservation Lead Time Policy can be edited. Reservations that have an Approved status can only be canceled and not edited in the Patron Portal.
Cancel a Reservation
To cancel Reservation:
- Navigate to the Home .
- Find the Reservation in Upcoming Reservations.
- Click the Reservation to open details.
- To cancel the Reservation..
- In mobile, click the cart icon and Cancel CK-##.
- On the desktop select Cancel CK-## from the menu on the left.
- In mobile, click the cart
- Confirm cancellation by selecting Yes in the cancel reservation modal.
Renew a Current Checkout
When Checkout Center policy allows, renewals may be allowed in Patron Portal. If allowed, Patrons can renew reservations provided they are within a set the Renewal Grace Period and that they do not renew a reservation beyond the Renewal Count Limit.
To renew Checkout:
- Navigate to Home .
- Find the allocation in Current Checkouts.
- Click the Checkout to open details.
- To create the copy…
- In mobile, click the cart icon and Renew CK-##.
- On the desktop select Renew CK-## from the menu on the left.
- In mobile, click the cart
- Editing Checkout screen will display the current Renewal Limit and Max Checkout Reserve limit available and any warnings to address.
- Adjust the End Time and save your changes.
Copy an Existing Reservation or Checkout
To copy an allocation:
- Navigate to Home .
- Find the allocation in Upcoming Reservations, Current Checkouts or History.
- Click the allocation to open details.
- To create the copy…
- In mobile, click the cart icon and Copy CK-##.
- On the desktop select Copy CK-## from the menu on the left.
- In mobile, click the cart
- A new Reservation screen will appear with the items from the copy allocation in the Contents section.
- See Create a New Reservation for details on completing and saving your copy.
Home
The home screen shows your Upcoming Reservations, Current Checkouts, Assigned Resources, and History of completed and canceled Reservations across all authorized Checkout Centers.
Click a reservation to open details.
Projects
For those with Projects enabled, view active, assigned Projects along with Project Status. Project Status provides finer control to manage project related reservations. Project Status is managed in Greenlighting and include:
- Greenlit: A fully approved Project. Patrons can make reservations for the Project and are authorized to pick those reservations up.
- Yellowlit: A partially approved Project. Patrons can make a reservation for the Project, but are not yet authorized to pick those reservations up.
- Unapproved: Patrons are not yet allowed to make reservations for the Project.
Access
Users can also view their Groups and Section Memberships if enabled from WebCheckout’s Global settings. View Certified Resource Types and the Checkout Centers that provide those items (requires Certifications Module).
Centers
Select the Centers ![]() icon to view hours of operations, contact information, view Catalog, and important reservation information such as the Message of the Day. Once in the Checkout Center, select the view
icon to view hours of operations, contact information, view Catalog, and important reservation information such as the Message of the Day. Once in the Checkout Center, select the view ![]() icon for additional information such as:
icon for additional information such as:
- Message of the Day: Important announcements and updates from the Checkout Center.
- Reservation Information: Review specific policies or reservation requirements.
- Report a Problem: Submit a trouble ticket to the Checkout Center. Ticket Summary and Description are required fields. Attachments can be added and are Protected. Ticket will record the Patron as the Reporting Patron.
Patrons have access to open and patron authorized Centers only.
Billing
The Billing menu will display a count of all open invoices, and the Billing page displays all current and past invoices. Click on an invoice to view details.